WordPress on a Raspberry Pi to Cloudflare Workers: the Migration, Step by Step
Since it started, this blog has been a WordPress site served from the Raspberry Pi 5 in my house, through a Cloudflare Tunnel. In October, Google Search Console reported server errors (5xx). WordPress was not the cause. My home internet line was: on 30 October the tunnel was offline for about an hour, and on 1 November for almost four hours. During those hours every visitor, and Googlebot, found no server.
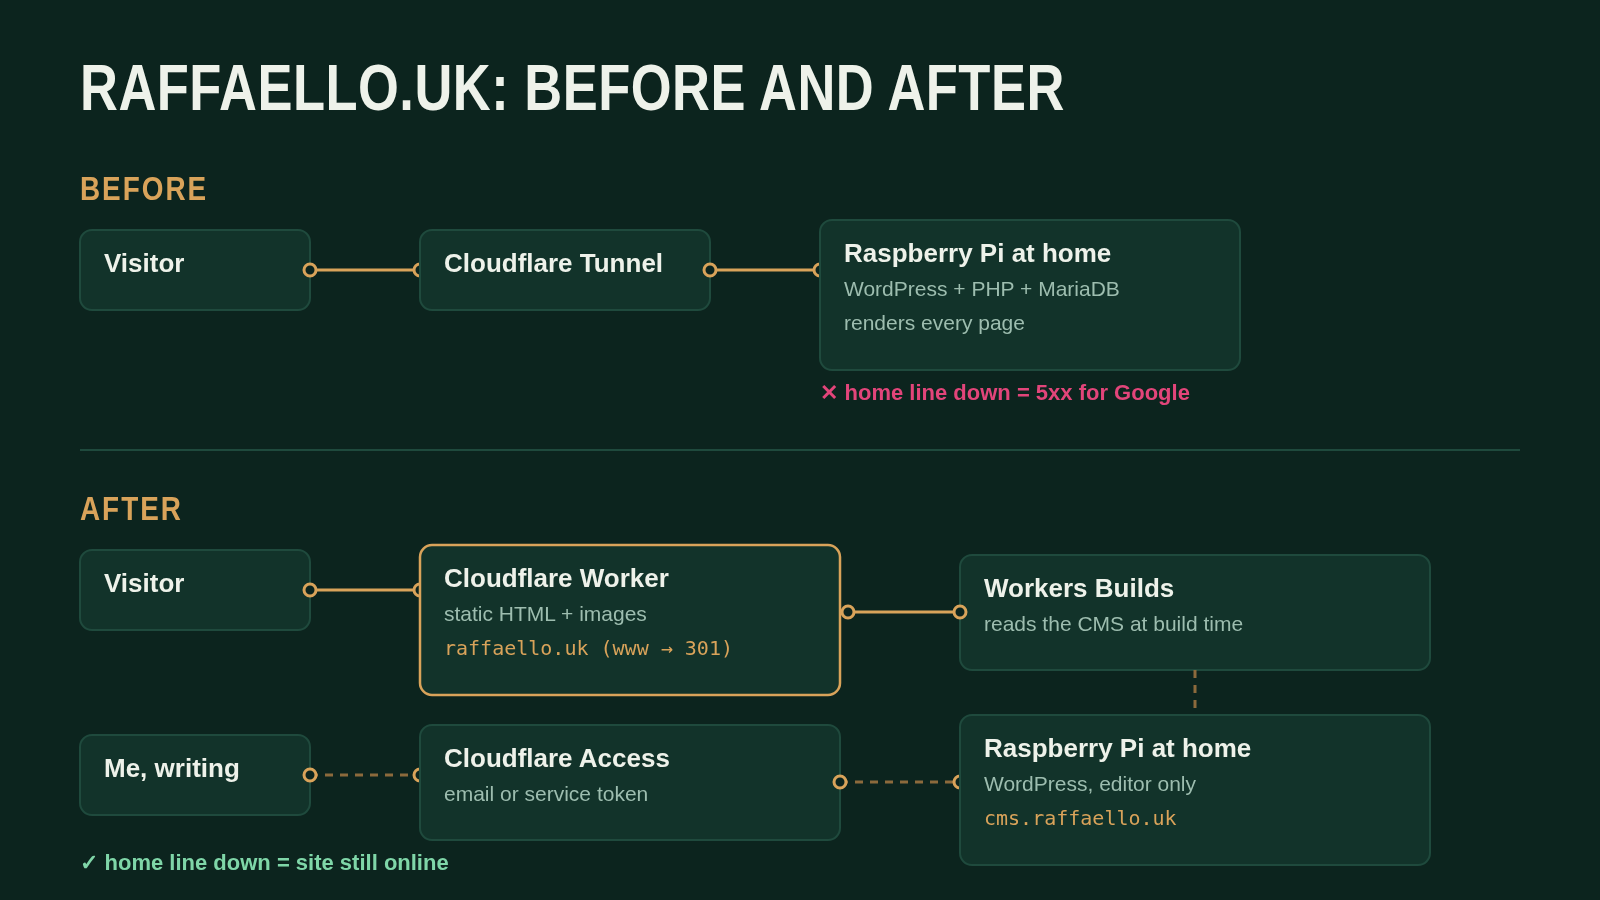
I wanted to keep WordPress, because I like to write in it and Rank Math does my SEO. So I separated the two jobs. WordPress stays on the Pi, but only as the editor. The public site is now a set of static pages on Cloudflare. When the Pi or the line stops, the readers do not see a difference.
This article tells you what I did, step by step: GitHub, Workers Builds, Cloudflare Access, the domain switch and the WordPress settings. It also tells you the three problems that stopped me, because each one can stop you too.
The parts
- WordPress on the Pi, now at
cms.raffaello.uk. Cloudflare Access protects the full hostname. - Astro builds the public site. It reads posts, pages, categories and the Rank Math SEO tags from the WordPress REST API. It copies each image into the build.
- A private GitHub repository holds the Astro code.
- Cloudflare Workers Builds builds the site from GitHub and publishes it.
- Cloudflare Workers static assets serves the pages on
raffaello.uk. There is no Worker script, only files.
Step 1: put the Astro site on GitHub
The Astro project keeps the WordPress URLs: /slug/ for English, /it/slug/ for Italian, and the category archives. The wrangler.jsonc file tells Cloudflare to serve the dist folder as static files:
{
  "name": "raffaello-blog",
  "compatibility_date": "2026-11-01",
  "assets": {
    "directory": "./dist",
    "html_handling": "auto-trailing-slash",
    "not_found_handling": "404-page"
  }
}- Create a private repository on GitHub.
- Push the Astro project to the
mainbranch. - Keep secrets out of the repository. The build gets them from Cloudflare (step 4).
Step 2: connect the repository to Workers Builds
- In the Cloudflare dashboard, open Workers & Pages.
- Create a Worker and select Import a repository.
- Give Cloudflare access to the GitHub repository.
- Set the build command to
npm run build. - Set the deploy command to
npx wrangler deploy. - Set the production branch to
main.
Now each push to main starts a build, and a good build goes live. Other branches make preview versions on a workers.dev address. I use one for the new design of this blog.
Note: previews have their own build variables. If you set the variables only for production, the preview builds cannot get into WordPress.
Step 3: put WordPress behind Cloudflare Access
WordPress must not be public any more, but the build runs on Cloudflare machines, not on mine. It needs its own key. In Access, that key is a service token.
- In the tunnel, add a published application route:
cms.raffaello.ukto the WordPress container. - Open Zero Trust → Access controls → Service credentials.
- Create a service token. Copy the Client ID and the Client Secret. Cloudflare shows the secret one time only.
- Open Policies. Create a policy with the action Service Auth that includes the service token.
- Create a second policy with the action Allow that includes your email address.
- Open Applications. Create a self-hosted application for
cms.raffaello.uk. - Attach both policies to the application.
Caution: step 7 is the one I missed. My policy existed, but its column Used by applications showed 0. Each build stopped with a 302, a redirect to the Access login page. If you see a 302 from Access, look at that column first.
Step 4: give the build the token
- Open the Worker, then Settings → Build → Variables and secrets.
- Add
WP_CMSwith the valuehttps://cms.raffaello.uk. - Add
CF_ACCESS_CLIENT_IDwith the Client ID. - Add
CF_ACCESS_CLIENT_SECRETas a secret, with the Client Secret.
The build sends the two values as headers on each request to WordPress. It also refuses redirects, so a wrong token stops the build with a clear error. It does not build an empty site:
const headers = {
  'CF-Access-Client-Id': process.env.CF_ACCESS_CLIENT_ID,
  'CF-Access-Client-Secret': process.env.CF_ACCESS_CLIENT_SECRET,
};
const res = await fetch(url, { headers, redirect: 'manual' });
if (!res.ok) throw new Error(`WordPress answered ${res.status}: check the Access service token`);
To find the cause of my 302, I made the build log write if the credentials were present, and their length. It never writes their values.
Step 5: look at what the build publishes
With Access correct, the build was green and the deploy failed: Asset too large. Workers static assets accepts files up to 25 MiB. My script copied all the media library, and the library had wxr.xml: a 36 MB export of the full blog that I uploaded last year. It was too large, and it must not be public.
- Copy only images from the media library (
/wp/v2/media?media_type=image). - Skip each file larger than 25 MiB, with a warning in the log.
- Remove exports and backups from the WordPress media library. Keep them in a private place.
Step 6: make a test that stops a bad deploy
Before the domain switch, I put in a file every URL that Google knew from the old WordPress sitemaps. Then I compared them with the new site. The 22 posts and pages were there. The 19 category archives were not. When I clicked through the site, I did not see this.
So that list became a test. The build command is now:
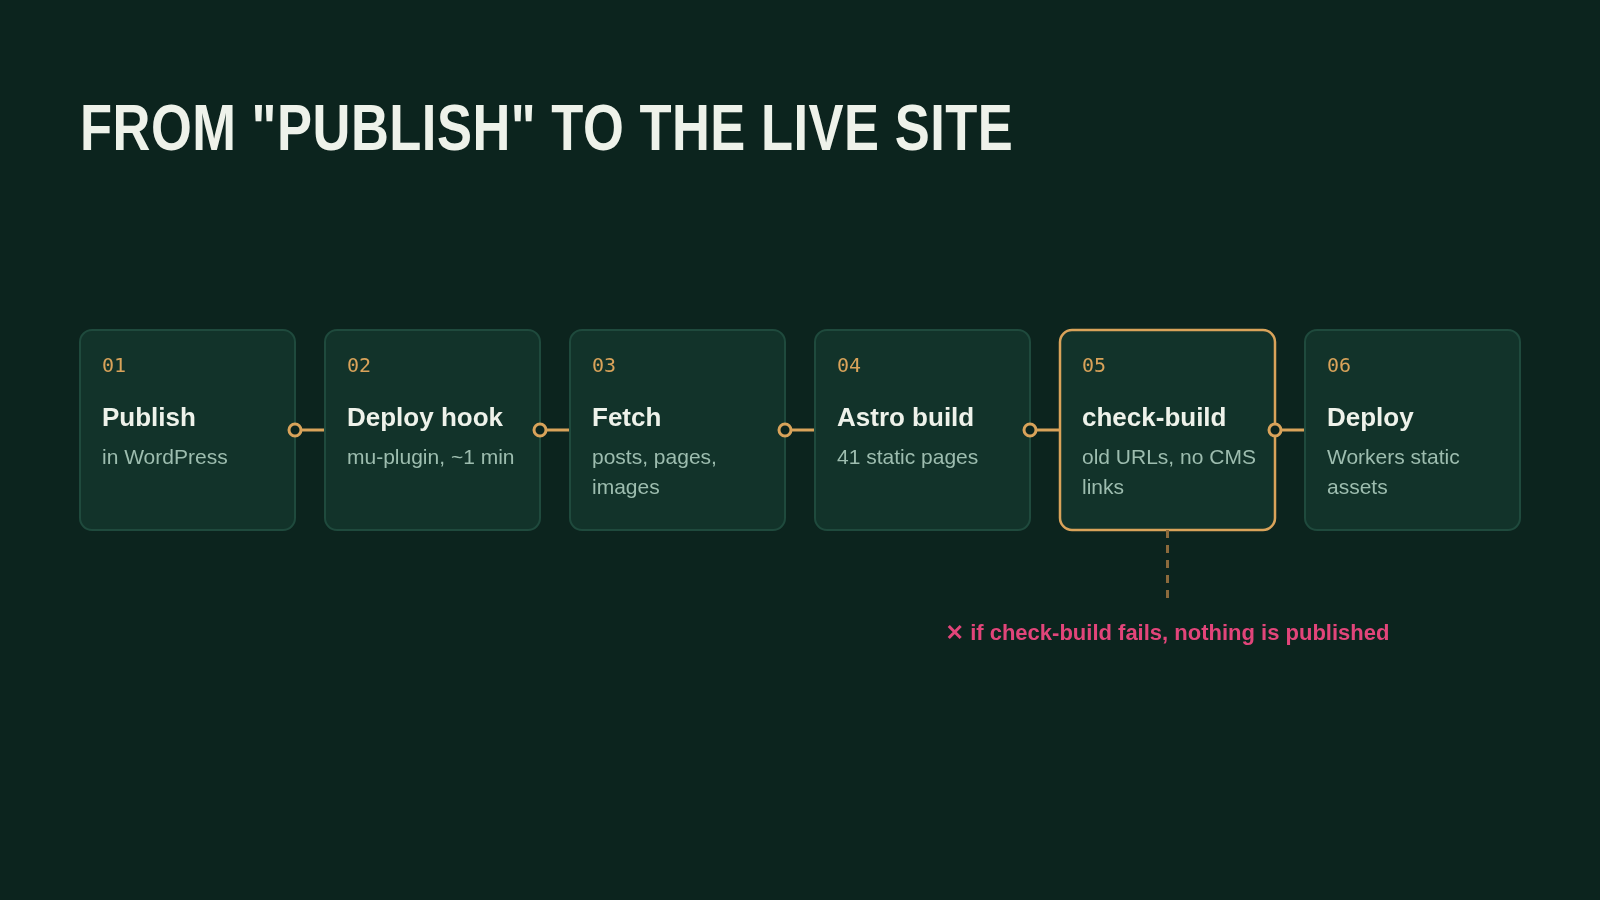
node scripts/fetch-media.mjs && astro build && node scripts/check-build.mjscheck-build does three checks. If one check fails, the build stops and Cloudflare publishes nothing:
- Each URL from the old sitemaps exists in the new site (37 URLs).
- No page links to
cms.raffaello.uk, because readers cannot open it. - No page has a WordPress form, because a static page cannot send it.
Check 3 found a real problem. The contact page had a SureForms form that sent data to admin-ajax.php. On the static site it looked correct and sent nothing. Now the page shows an email address. Cloudflare Email Routing sends that address to my inbox.
Step 7: keep the test address out of Google
The site is also on a workers.dev address. Google must index only raffaello.uk. Put this in public/_headers:
https://raffaello-blog.<your-subdomain>.workers.dev/*
  X-Robots-Tag: noindex
Old WordPress addresses go to their new place with public/_redirects: /wp-admin/* and /wp-login.php to the CMS, /feed/ to /rss.xml, /sitemap_index.xml to /sitemap-index.xml.
Step 8: move the domain
The same tunnel serves many other services on my Pi. Before I changed it, I recorded the HTTP status of each hostname. After the change I compared them again.
- In the Worker, open Domains and add
www.raffaello.uk. It had no DNS record, so there was no conflict. - Try to add
raffaello.uk. Cloudflare refuses, because the tunnel record still exists. - In Networking → Tunnels, open the tunnel, then Routes. Delete the
raffaello.ukroute. Wait for the message Route deleted successfully. It also deletes the DNS record. - Add
raffaello.ukto the Worker immediately. - In Rules → Redirect Rules, use the template Redirect from WWW to root. It sends a 301 from
wwwtoraffaello.uk. Select Preserve query string.
The site was offline for about one minute. The other hostnames, the mail records, DKIM and DMARC did not change.
Caution: at step 3, wait for the confirmation before you go to another page. The first time, I went to another page too quickly and the delete did not happen.
Step 9: change WordPress into an editor only
In the WordPress container, the address of the site and the address of WordPress are now different:
define('WP_HOME', 'https://raffaello.uk');         // links and canonicals do not change
define('WP_SITEURL', 'https://cms.raffaello.uk');  // admin, REST API, uploads
define('DISABLE_WP_CRON', true);- REST API. The block editor builds its REST address from
WP_HOME, andraffaello.uk/wp-jsonis not WordPress any more. A small must-use plugin changes the address to the CMS host with therest_urlfilter. - Cron. WordPress cannot call itself through Access. Scheduled posts need cron, so the Pi calls it every minute on the local port:
* * * * * curl -s -o /dev/null http://127.0.0.1:8888/wp-cron.php - Images. New uploads now have
cms.raffaello.ukaddresses. The build changes them toraffaello.ukand copies the files, and test 2 makes sure of it.
Step 10: rebuild the site when I publish
- In the Worker, open Settings → Build → Deploy Hooks.
- Create a hook for the branch
main. Keep the URL secret: it starts a build. - Save the URL in WordPress, not in the code.
The same must-use plugin calls the hook when I publish, update or unpublish a post or a page. The block editor saves more than one time, so the plugin waits one minute and then starts one build only.
Step 11: tell Google
- In Search Console, open Sitemaps. Submit
https://raffaello.uk/sitemap-index.xml. - Open Pages → Server error (5xx). Select Validate fix.
What I learned
- If Access sends a redirect to its login page, make sure that the policy is attached to the application, not only that it exists.
- A list of the old URLs, used as a test, finds more than a long walk through the site. Mine found the categories and the form.
- Look at what your build publishes. Mine almost put a full export of the blog on the internet.
- Before you change a shared tunnel, record the status of every hostname. Then compare.
I did this migration with Claude Code, on the Pi and in the browser. It found and repaired the problems in this article, and I made the decisions. The Pi still runs WordPress, the trading bots and everything else. Now it does not have to keep the blog online.